Wednesday 25 August 2021

"Book Of Wisdom" by Kerrie Barnes

 Hello everyone and welcome once again to my little corner of the iCraft Blog.  Today I am sharing my iCraft Book Box and journal.  I absolutely love owls, so I decided to use them as inspiration for my project.


I started by gluing the iCraft Book Box together with tacky glue and placed rubber bands around the box to hold everything in place while it dried.  Using iCraft Decoupage Glue, I glued ordinary tissues all over the box and waited for it to dry.  I then painted inside and out with iCraft Heavy Gesso Black.  I used waxes and lightly spread colour to areas of the box, then lined the interior with the iCraft Serene Shades paper pack, after first inking the edges of the paper.


I chose a large iCraft 3D Wooden Embellishment, coated it with iCraft Heavy Gesso Black and gave it the wax treatment after it dried.  Using an iCraft Insta Transfer, I cut the desired size following the instructions on the packaging. I then adhered my chosen image to the wooden embellishment, waited until it completely dried and coated everything with iCraft Decoupage Varnish.  I added two hinges from my craft stash and gave them the wax treatment as well.  My hubby suggested pop rivets for the the hinges because glue wouldn't have held them on.  Then we added black UV resin over the rivets to hide the rivet heads and tails.  Deciding I needed more copper, I glued iCraft Foil Leaf to a section of the wooden embellishment around the owl on the lid.


Then came the book.  I cut it to size using a bandsaw and hollowed out the interior the same.  Then using the same technique as the box, I covered the book in tissues and iCraft Decoupage Glue.  Using iCraft Metallic Paint in Ancient Copper, I dry brushed the exterior of the book, and once dry I painted the interior of the book with iCraft Heavy Gesso Black and added wax.  My husband 3D printed two lovely owls for me, so I coated them in black gesso and added wax once dry.  I used another partial iCraft Wooden Embellishment to the top of the book with one of my printed owls.  Lastly I gave everything a coat of iCraft Decoupage Varnish, and added another owl to the interior of the book.


Thank you so much for stopping by and until next time, stay safe and happy.  Kerrie  xx.  iCraft products used are listed below and are available at www.tinamarie.com.au.


iCraft 6x8 Book Box

iCraft Insta Transfer
iCraft Heavy Gesso Black

i032

WE0490

iCraft Decoupage Glue


iCraft Decoupage Varnish
iCraft Ancient Copper Metallic


iCraft Serene Shades Paper Pack


Sunday 22 August 2021

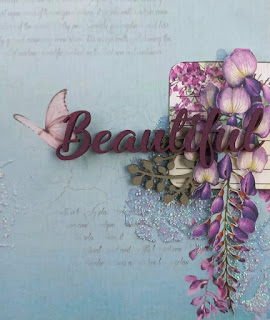
Beautiful by Rosalie Duke-Stanley


Hi iCraft friends - It was time to do a pretty scrapbook layout and the beautiful Purple Blossoms paper range was perfect for a photo of my Mum and Granddaughter. I loved the   layering that you could do with the wooden embellishments, fussy cut pieces and cut outs in the paper range. I also wanted to add a small amount of mixed media to give the layout some texture and depth. 

I applied a mixture of modeling paste and Jasperware chalk paint with a stencil (8563) randomly on the page - focusing on the top and bottom left side as well as bottom right hand side. The aim is so you could see parts of the stenciled pattern. Before it was completely dried, sprinkled Arty Balls and Crystal shimmer on top. You only want a bit to catch in the wet paste. While I waited for it to dry, I fussy cut the purple flowers, leaves from the paper range as well as painting the wooden Embellishments - frame and word in Wine and Dine Chalk paint and the foliage in Minnesota Pine. To add some extra layering, I cut out some of the hanging flowers from the other pieces of paper and some of the 'notes' embellishments

You can start layering. Tip: start with your photo and frame and raise it with foam tape so that you can work around it. I always adhere my main photo first so I can place some pieces underneath. 

Once you are happy with you layering, glue or tape down. For some of the leaves, I also raised on foam tape so that they were raised up and added some depth to the layout. 
Tip: Move your flowers and leaves around placing some on top until you are happy with the layout and then glue down. I sometimes take a photo with my phone of where I want everything just in case I have to move pieces and don't want to forget where I was putting them. 
Final tip: if you have a layout that is focused all on one side, it is always good to balance it out with something on the other side. Doesn't need to to be big, even some flowers, a word or cluster of small tags. However in the end it is your layout so do what you feel is right for you. 


I have added some close up photos of the layout and some of the products used. 

For a full range of iCraft products, please follow the link below:

I hope you enjoy and would love to here from you in the comments bar below. Have a great day :) 


Wednesday 18 August 2021

Rustic Dragonfly Watering Can - By Deb Stephens


Hello iCraft Friends! It's Deb here again, explaining how I created this rustic watering can using lots of iCraft products.

Start by applying gesso with a sponge all over the metal watering can and dry. Once cooled, apply a second coat and dry. Apply iCraft chalk paint in Cypress Green all over with a sponge. Trim Ancient Timepiece decoupage paper to get the elements to fit around the can. Glue down with iCraft decoupage glue and let dry. Apply crackling gel all over and allow to dry. Apply iCraft  chalk paint Autumn Valley with a broad flat brush, fast, so that the paint doesn’t “pull” and clump. Let it dry and watch the magic happen as cracks appear. Sand certain spots so that the green is more visible. Apply a thin coat of iCraft  decoupage varnish, making sure not to fill the cracks. After it dry’s, apply brown oil paint all over the surface with a brush and then rub back with a soft clean cloth. The oil paint fills the cracks and gives a more rustic effect. Allow to dry. Apply the iCraft mini gold dot insta transfers to the top of the can. I painted the dragonfly element from my stash using a mix of iCraft metallic colours and topped off with Moon White Metallic for a shimmer. I then adhered it to the middle of the can. Once the glue dried, I applied another two coats of iCraft decoupage varnish to seal all surfaces. Here are a few close up photos. Have an iCraft-tastic day everyone!


iCraft products used are listed and linked below:


Friday 13 August 2021

Mini Top Hats By Kerrie Barnes

 Mini Top Hats


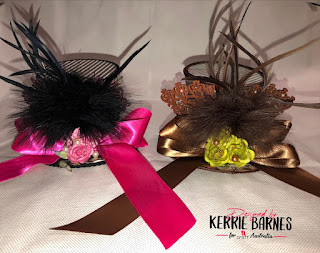
Hello everyone and welcome back to the iCraft blog.  My newest creations are mini top hats, made from the very stunning Country Garden and Bloom De Fleur paper collections. 


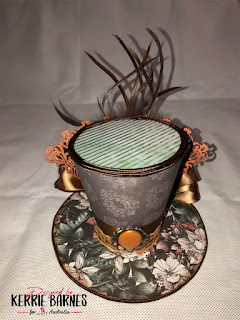
 I started by downloading a template from the internet and sizing it to my specifications.  I traced and then cut two base pieces of box board approximately 16.5 cm long and 15.5 cm wide.  These pieces became the brims for my hats.  Then I traced and cut two crown pieces from box board measuring approximately 11.5 cm long by 9.5 cm wide.  Next came the hat bands and they were a little trickier.  I traced the template that I'd downloaded, but I decided I wanted them slightly longer and wider.  Out of sheets of Country Garden and then Bloom De Fleur, I cut hat bands measuring approximately 30 cm long, 9.5 cm wide, plus a foldable tab measuring 8.5 cm.  See picture below for template.


I cut the various papers for each hat and glued them onto my box board.  I used only paper from the collections for the hat bands because box board would have been way to hard to bend.  I then attached the bands to the crowns with 450 glue and once dry, I glued the dried band and crown onto the hat base/brim.


I wove ribbon around the bands and topped them with lace, then added double bows at the backs of both hats.


I used feathers from my vast collection of goodies and attached those above the bows, then added iCraft flowers to the ribbons as well as iCraft string pearls.  I am a terrible photographer, but if you look closely, you can see the beautiful iCraft fan wooden embellishment behind the feathers on the brown hat, and an iCraft wooden frame embellishment on the pink hat.  I used various iCraft paints on these embellishments as well.


I used trims around the base edges of each hat as well as the crown.  I also used two metal cameos from my stash and painted them with various iCraft paint before gluing them to the front of each top hat.  I have never made top hats before, so this was a real learning experience for me.  I hope I have inspired you all to create weird, wonderful and wacky top hats.


Thank you so much for stopping by and taking a look at my projects.  All iCraft products used are listed below and are available at tinamarie.com.au.

iCraft Country Garden Collection
iCraft Bloom De Fleur Paper Collection


i304

i376

iCraft Mulberry Roses Pink


iCraft Pearl Strings White

iCraft Pearl Strings Copper

iCraft Mulberry Roses Green