Tuesday 25 January 2022

"Beautiful Moments" Festive Platter by Kerrie Barnes


Hello everyone and welcome to my corner of the iCraft blog.  Today I am sharing my Festive Platter, Beautiful Moments.  I began by coating the large base piece with Heavy Gesso White, and the border section and scroll pieces with Heavy Gesso Black.


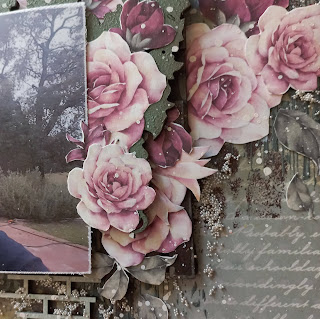
I painted the large base section with iCraft Decoupage Glue and gently placed my iCraft Decoupage paper on top, smoothing out any bubbles very carefully.  This took quite a while to fully dry, so I set about fussy cutting iCraft's Country Garden Element Sheet.


I chose some gold doilies from iCraft's Insta Transfers 7011, followed the instructions, and adhered them to my base piece.  I used black ink and a dauber to highlight around the base piece of my platter.


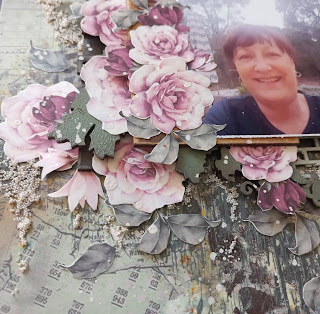
Adding iCraft's Antique Bronze Metallic Wax to the scroll pieces, I then glued them onto my base, after gluing down my border piece.  After that dried, I layered my fussy cut flowers after I inked the edges with black ink.


I added two of iCraft's green Mulberry Flowers on top of my layered fussy cut flowers, and also slipped in some wooden embellishments after adding antique bronze wax.  Finding a lovely blue vine in my stash, I cut it into smaller sections, and added them to my project.


When everything was dry, I added some of iCraft's Arty Balls, and some flicks of Coconut Milk Chalk Paint from iCraft.  I also added my titles from iCraft's Flimsy Sheet 8.  Thank you for sharing in my creative project, and until next time, stay safe and well.  Kerrie xx.

All products used in this project (except for the blue vine), can be found at tinamarie.com.au.

Wooden Embellishment FB015


Country Garden Element Sheet


Flimsy Sheet 08
Decoupage sheet Nesting Bird


Insta Transfer 7011

i554

iCraft Rose Mulberry Flowers Green


Saturday 22 January 2022

Layered Rose Garden by Rosalie Duke-Stanley


The beautiful paper range The Rose World is perfect for a layout that is filled with fussy cutting elements and lots of layers. 

I had a wonderful photo that was taken in 2021 and to me - a nature selfie to remind me of the moment. The photo was soft and misty so a lovely layout of softness and rosy colours. 

I prepared the base page with a clear gesso and once dry, stenciled cobblestone pattern with chalk paint - Stewart House brown across the layout where my main feature would be. You will only see bits of this when you have finished. Mixing chalk paint Minnesota Pines and iCraft texture paste, stencil long lines over the top of the brown stencil. This will start to add texture. 

Paint your wooden pieces with chalk paint. Garden gate, Vines (both pieces) window frame and bricks. I added white gesso to the green for the bricks. Once dry, add metallic wax to the window frame to add texture and a edging of light tan chalk pain to the edge. 
Colours below in the products. 

Select a page form the paper pack that has lots of flowers to cut out. I used one full  sheet. 

Once you have every thing ready, layer your pieces starting with the garden gate. I have placed some panels on the left and right. Build up from there and add in our flowers between the chipboard pieces. Once glued down and all dry. add Arty Balls around the layout to add the final touch. I finished by painting fine lines around the edges of the chipboard to make them stand out. 

I hope you enjoy this layered page. Links on the products and also if you click below for more products. 


Monday 17 January 2022

On the Day you were born - Michelle van Oudtshoorn

Hello lovelies

I am on the blog today with an album that I have made using a Ready Album - these arrive already pre-cut with chipboard covers and cardstock - and all you have to do is put it together - no measuring needed. I have used the Octagon Ready Album and Toddler's Story paper collection.

The kit is first assembled - there are instructions that come with the album kit. The cover us made using many fussy cut elements from the papers and element sheet. The wooden frame as been painted very lightly with Distant Haze Chalk Paint.
I first put the pages together before adding the pages to the album. I used the octagon cardstock for the inner pages as a template to cut out my patterned paper for the pages - taken from both the 12"x12" and the 8"x8" paper pads. I also fussy cut a number of elements from Toddler's Story Element Sheet as well as from the papers in the two paper pads. 
This is the first page:
All the elements on this page are fussy cut from the Elements sheet. 


Here are page 2 and 3 


Page 4 and 5
On page 4 I have used Chippings #10010. The base is covered first with a piece from Decoupage paper #3044, then covering the rest of the chipping with paper and using the circular part of the chipping as a frame. The titles are also part of the chippings, which I painted with Distant Haze Chalk Paint. I then cut wording from the Flimsy Sheet #7 for the title. Page 5 I have created a little flap with tags and used a ribbon to hold it together 


 For the last page I have made a waterfall, and closing this off with a band with a magnet at the end.

The top flap is done layering fussy cut elements.

These are the products I have used 


Thanks for popping by,
Michelle