Wednesday 25 May 2022

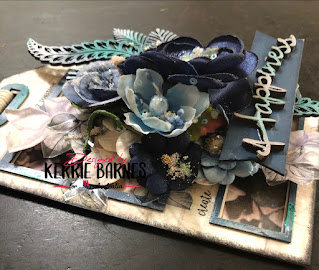
"Stay Positive and Create Happiness Chipping Tag" By Kerrie Barnes

 Hello and welcome to my new iCraft project.  I have created a tag using an iCraft Chipping piece and the very beautiful Majestic Blooms Paper Collection.  Firstly, I took apart the chipping tag which is comprised of six separate pieces.  I traced the base tag section onto majestic blooms paper, then cut it out and glued it onto the tag base.


I then traced the second tag layer onto a piece of majestic blooms paper, and glued it down as well.  I inked around both the first and second tag layers with black ink, then moved on to the next step.


Using iCraft Old World Blue Chalk Paint, I painted each of the smaller tag sections and set them aside to dry.  I then painted Wooden Embellishment i393 with Old World Blue and set it aside to dry while I fussy cut some flowers from the majestic blooms collection.


Once the embellishment was dry, I rubbed on some iCraft Metallic Wax in Billow and Steel Silver, then did the same to the iCraft Happiness Embellishment i003.


I assembled everything together, layering flowers from my craft stash with fussy cut flowers and the wooden embellishments.  I used kitchen string at the top of my tag and also added tiny silver sequins, iCraft Arty Balls and iCraft Frosty Shimmer to the tops of the flowers.


Thank you for visiting the iCraft Australia Blog.  Until next time, stay safe and well.  Kerrie xx.


All iCraft products used can be found at tinamarie.com.au.


Chipping #10001

i003

Wooden Embellishment i393


iCraft Australia DT 2022


Tuesday 24 May 2022

"Together forever" - by Michelle van Oudtshoorn

 Hello friends,

I have created a layout using paper from the Majestic Blooms 12 x 12 paper pack. Here is my layout:


I have used two of the same paper. The paper has beautiful flowers on it, but I decided I would like my flowers more in the centre of the page instead of the bottom, hence I cut about 4 inches off the other page with top flowers and cut four inches of the other page and then combined the two. I then fussy cut the flowers off the remaining page and layered these on foam tape for dimension and adding other flowers through the flower cluster.
The photo has been matted with other patterned paper, before adhering the page with foam tape along the side of the flower cluster.


The title "together forever" and the two hearts are painted with Radical Raspberry Chalk paint and then added to the flower cluster. The foliage was then also lightly brushed over with white gesso.


The foliage was painted with deep waters green chalk paint and added among the flower cluster.


I then dry brushed some white gesso to the background paper (if you look at the photo above, you can see the brown leaves have been brushed over). I finished off adding some hand drown lines and the some pearls.

These are the products I have used:


Thanks for popping bye. Stay tuned for more inspiration in the coming days. 


Sunday 22 May 2022

Rosalie Duke-Stanley Woodland Cuteness


Time for some cuteness with a tag featuring the cute squirrel from the iCraft Decoupage range. I cute out the larger squirrel on the paper as well as some leaves from the flimsy paper and some flowers from the Country Garden Range. I had some left over from other projects. 

Using a brown chalk paint, randomly paint the tag. You don't want it to be covered perfectly. Stencil randomly over your tag with modelling paste and chalk paint - Stewart House Brown. To thicken it slightly and add a metallic tone, I mixed in Gold Metallic wax. Leave To dry. 

Paint your wooden embellishments. I was using left over pieces. Cut a small piece of Pearly String - I used Gold. snip each ball and put in a small amount of red alcohol ink to change the colour.  

Put together by mounting the squirrel on some foam pieces to raise it up but remember to leave room to slide the wooden embellishments under. Add the flowers and leaves. Finish off by flicking some of my favourite chalk paint over the top - Coconut Milk. Finally add your pearls. I have only added a few but you can add as many as you want. 

I hope you have enjoyed. I have put links to some of the products below however, click on the link below to the full range of products:


Monday 9 May 2022

“Our Family” by Kerrie Barnes

 Hello again everyone.  I have a simple layout to share with you today.  I have used the very pretty Bloom De Fleur Collection from iCraft, as well as iCraft wooden embellishments and iCraft wax.


I began by selecting two pieces of paper from the Bloom De Fleur Collection.  I tore 2 pieces of blue spotted paper at the corners, one larger than the other, and adhered them with double sided tape to my black piece of paper.


I fussy cut some flowers from the same collection, as well as some other shapes in varying sizes, and layered everything together.


I chose iCraft wooden embellishments i064 and i150, and coated them with iCraft Antique Bronze Wax, and tucked them around the photo of my nieces and nephew.


I always use either double sided foam tape or pieces of recycled cardboard to layer my flowers and other embellishments.


I also layered flowers over the right hand bottom corner of the layout, tucking some underneath the blue spotty paper.  I chose another little tag, "Life is Beautiful", and added it to the corner with some cardboard underneath.  Then I added two little bees to the layout, also with cardboard underneath for a 3D effect.  As always, thank you for taking a look at my project.  I really hope you like it.  Take care and see you next time.  Kerrie xx.

All products used can be found at www.tinamarie.com.au.


iCraft Bloom De Fleur Collection


iCraft Clockface embellishment i064


iCraft wooden embellishment i150