Thursday 31 March 2022

Little Moments Big Memories by Michelle van Oudtshoorn

 Hello crafty friends

I have created another layout using the Flimsy sheets - I just love them, and as I love fussy cutting these are just right up my alley. iCraft have such beautiful Flimsy sheets.

The paper is from The Rose World Collection. I used two pieces of paper and torn and added together. I have used the Flimsy sheet no 2 and cut out all the flowers and the leaves.These were layered around the photo in different heights using foam tape to create dimension. 

Once these were added, I added flourish chippings to the cluster. These were painted with blue acrylic paint and then once dry I sanded over these and on the edges.
The title Little Moments Big Memories is also from a Flimsy sheet - no 8

These are the products that I have used


Thank you for visiting the blog.

Take care,
Michelle


Thursday 24 March 2022

"Adventure" By Kerrie Barnes

 Hello and welcome.  Today I have a nautical themed project to share with you all.  I began with the iCraft Back in Time Element, i062, which I painted with two coats of iCraft Heavy Gesso Black.  Once dry, I used iCraft stencil #8601, with iCraft Modeling Paste.  The element comes apart in six sections.  There is the base, two top pieces, a plaque in the middle and two planks, one for the top and one for the bottom.


I used stencil 8601 on one half of the top piece, then flipped the stencil onto the second top piece, which connected the two together. Then I used iCraft stencil #8617 and iCraft modeling paste on the  two planks and set them aside to dry.


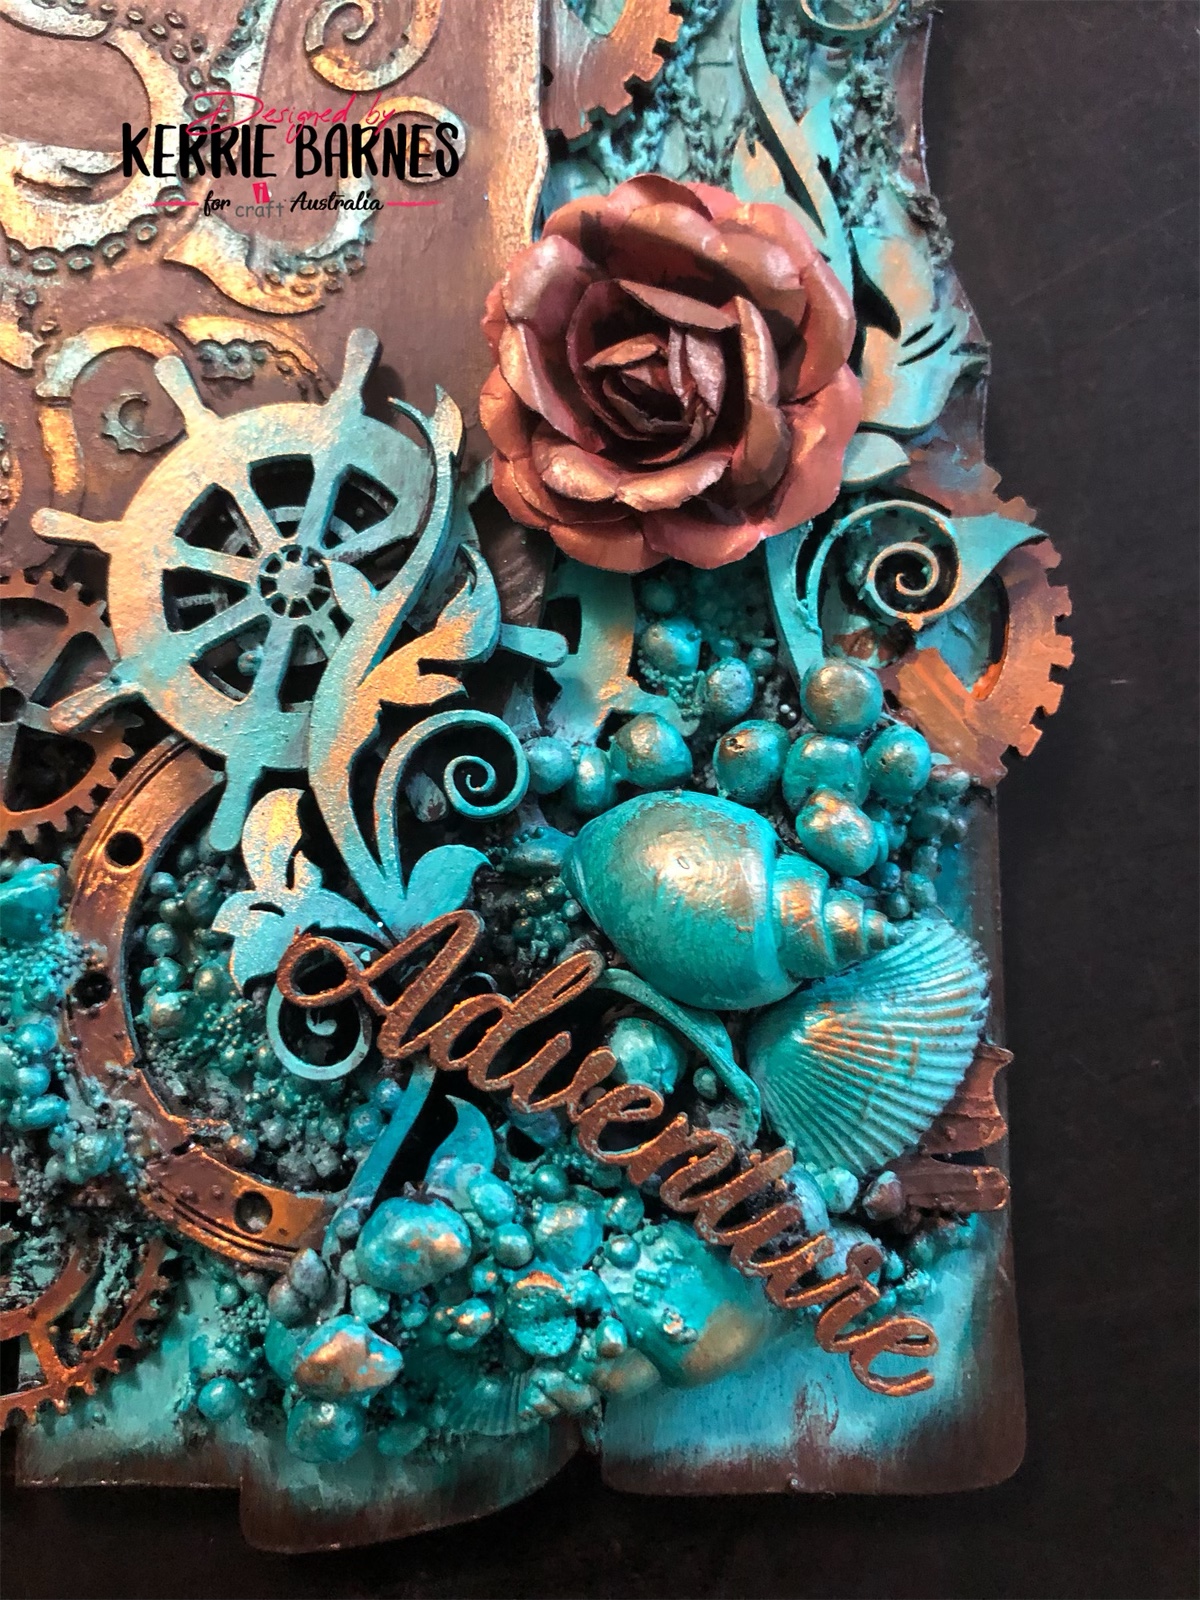
Using iCraft stencil #9126, I layered iCraft modeling paste over the plaque, then set it aside to dry.  I found an old grocery bag and cut a small section to use as fishing net on my project, then painted it with iCraft Heavy Gesso Black.


I layered and glued all the pieces together and added iCraft wooden embellishments i361, i144, i363 and i382 onto the project.  I then added various shells, a flower and iCraft Arty Balls before painting the project.


Choosing my favourite iCraft Chalk Paint colours, Stewart House Brown, Thai Teal, Midnight Coffee, Antique Photograph, Spice Island and Billow, I layered on my paint.  I cut tiny little chipboard off cuts to use as old nails on the top and bottom planks, before adding iCraft wax in Antique Bronze and Billow.  I wanted this project to look as "old world" as possible, with plenty of rusty pieces to complement the "under the sea" theme.  Hopefully it turned out okay.


As always, thank you so much for joining me on this crafty endeavour.  Stay safe and well and happy crafting.  Kerrie xx.  iCraft items can be found at www.tinamarie.com.au.


"Back in Time" Wooden Element i062

8601


i363

i353

i144

i382


Tuesday 22 March 2022

'A little bit of prettiness' frame by Rosalie Duke-Stanley


 Time to have some fun and create something pretty. I love the iCraft frames and wanted to create pinky prettiness and sparkle. I chose a beautiful oval frame and painted the pieces with chalk paint Coconut Milk.  Once dried, set aide some of the pieces to use for a project on another day and kept the larger pieces for the bottom of the frame. 

Cut the clock face from the decoupage paper. glue onto the oval base. Put aside. Paint the edges of oval out piece and smaller wooden pieces with watered down Radiant Raspberry chalk paint. You only want a hint of colour on the edges. When dry, rub the edge lightly with Romantic Pink wax. Just a hint of waxy pinkness. Paint the remaining wooden pieces with Minnesota Pines (one of my favourite colours) and dab some dark brown on the honey cone pieces. 

Start to make your frame. I have layered some fine gauze on the main base and then glued some of the honey cone pieces to peek just form the left side edge. These pieces will also raise up the oval frame to help you place some of the flower stems and other wooden pieces underneath. Layer the oval edge frame on top and build your frame by adding flowers. I start with the larger ones and build the smaller ones around. It works if you don't have the flowers matching each side. Move the flowers around until you are happy. 

I have used iCraft larger flowers and a range of their smaller ones - choose complimentary colours to add depth. Tuck your wooden leaves in and around to partly fill in the centre of the frame. Use the long stemmed mulberry flowers to fill in the spaces between the main flowers. Finally add in some of the flimsy leaves . 

Fill in the inside of the frame with some of the arty stones. Top with fine gauze strands on the top of the flowers and glue crystal shimmer  along the gauze strands and petals of the flowers to add some bling. Add a final dab of pink wax along the edges of some of the flowers. 


The key to putting the frame together is to have a play around with the flowers, wooden leaves until you are happy with the position of them. 

 I hope you enjoy my pretty pink frame. for more product information, scroll down below and click on the product to link to the store. 

Online store : https://tinamarie.com.au/shop