Saturday, 30 April 2022

Love by Michelle van Oudtshoorn

Hello lovelies

I am so in love with the Purple Blossom Pocket Paper Collection 12 x 12 papers. I have created a layout using this collection.

I painted all my wooden embellishments with Chalkpaint first  - the wooden leaves were painted with iCraft Chalk Paints - Billow and the clock and the arrow love were painted with Romantic Pink Metallic Chalk Paint.

I have cut the photo down to a circle size to fit under the clock face, and adhered with foam tape to the page. I have raised the frame so that I was able to added the leaves and other elements under the clock.

 
There is a page in the collection with the elements that can be fussy cut - these were the single flowers and the leaves. I fussy cut the long purple blossoms off the front cover the collection pack. The flowers, leaves, wooden leaves and purple blooms were then added around the photo and under the clock.

The title was added once the flowers and leaves were added. I then added multi-coloured beads to finish it off.
These are the products that I have used.


Thanks for visiting the blog today.

Take care,
Michelle


Sunday, 24 April 2022

“Cottage Garden” by Kerrie Barnes

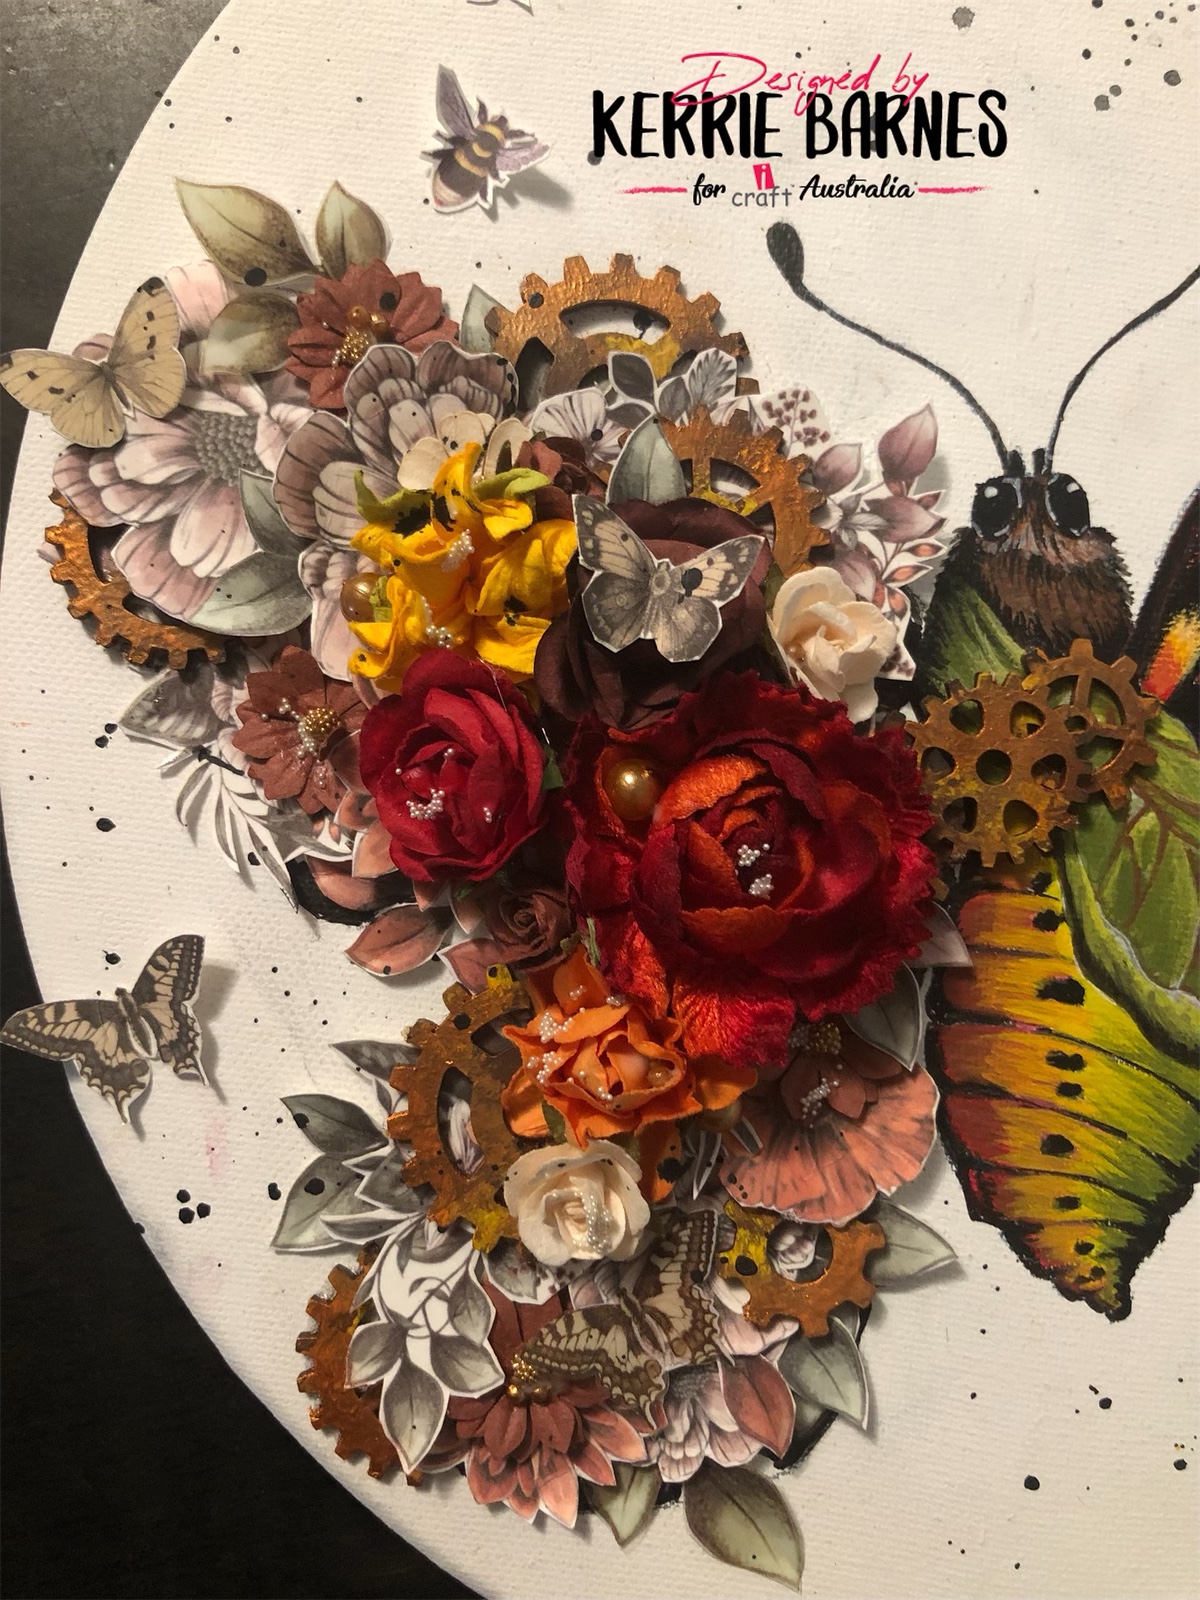
 Hello and welcome back to my corner of the iCraft Australia Blog.  I have a canvas to share today, which I named Cottage Garden.  I used loads of fussy cuts, flowers and chalk paint to create this.  I hope you enjoy it.


To begin with, I gave the canvas a quick coat of iCraft Heavy Gesso White, then downloaded a cute butterfly coming out of a chrysalis, from the internet.  I sketched half the butterfly and chrysalis onto my canvas, then began painting.


I started with the chrysalis and used iCraft Chalk Paints Sunny Yellow, Summer Fern, Midnight Coffee, Palm Tree, Coconut Milk, Camp Fire, Dark Secret, Rich Rouge and Crimson Depth.  After the chrysalis, I moved onto the rest of the butterfly.


Using iCraft Flimsy Sheet 10 and iCraft Country Garden Element Sheet, I fussy cut what felt like a thousand flowers and layered them to the left of the butterfly until I was happy with the placement.  I glued some directly to the canvas, and used double sided foam tape to others to add depth and dimension.


I found some gorgeous flowers in my stash box and added those to various areas, then painted iCraft Cog Cluster i418, added wax and stuck those under some flowers.  I also added cogs to the chrysalis as well.


I added little paint splashes with watered down iCraft Lights Out Chalk Paint, as well as some copper pearls and iCraft Arty Balls.  I hope you enjoyed this project.  It was so much fun to create.  Until next time, stay safe and well.  Kerrie xx.


For iCraft products visit Tina Ollet's website at www.tinamarie.com.au.


Cottage Garden Element Sheet


i418

Flimsy Sheet 10


Friday, 22 April 2022

Shades of Grey world with touches of colour


Time for some shades of grey. We don't always think of using grey, black and white as a feature but sometimes it is just right with a touch of colour. 

I chose the gorgeous fantasy paper and with some mixed media created a page that was perfect for a black and white photo. 

Start with the base page and using black gesso and modelling paste, randomly stencil across the page. Once dry, check where you will put your photo and embellishments and add more stenciling if you need to. 

I added the beautiful Moon white alcohol ink and dripped over some of the stenciling to break up the blackness of the bricks. Add some alcohol blending fluid to help spread the white ink. This will dry very quickly. To finish the base page, I randomly stamped the iCraft grid stamp over the page. It helps to add visual interest. Set aside. 

Fussy cut a range of flowers from the flimsy sheet. Remember to cut out some flies. Paint your wooden embellishments. For the oval shape under my photo, I used a left over piece from my last project. I painted the other chipboard with a range of greens and pinks and when dry, added watered down white chalk paint to the edges to add depth. 

To assemble, start by adding your over frame. I added small pieces of chipboard to raise it up so you can slide other pieces underneath. Add your photo - remember to distress the edges and raise it up with some more foam tape or spare wooden chipboard leftovers. 

Start by adding your wooden flowers and leaves to set the main base and add your flimsy flowers. Remember so mix up the different colours. Finally add your flies and add some quirkiness. 

I hope you enjoy this page and also the iCraft Range. click on the link below for the online store. 

Products listed below are link to the online store. 

https://tinamarie.com.au/shop